안드로이드에서는 Notification을 이용하여 상단바에 알림을 띄워 사용자에게 메시지를 전달할 수 있습니다. FCM과 같이 사용하여 백그라운드에서 사용할 수도 있고 포어그라운드 서비스에 사용하여 백그라운드에서 진행되고 있는 작업등의 정보를 알려줄 수도 있습니다.
Notification에 여러가지 기능들을 넣을 수도 있지만 우선은 아주 간단하게 제목과 내용을 입력한 후 버튼을 누르면 입력한 제목과 내용으로 알림이 오는 기능을 만들어보겠습니다.
완성된 기능

의존성 추가
공식문서에 따르면 Android 스튜디오로 만든 대부분의 프로젝트에는 NotificationCompat을 사용하는데 필요한 종속 항목이 포함되지만 없다면
dependencies {
    implementation "com.android.support:support-compat:28.0.0"
}
위와 같은 의존성을 추가해야 한다고 합니다. com.android.support 그룹의 다른 라이브러리에도 전이 종속 항목으로 support-compat이 포함되어 있다고 합니다.
제가 사용중인 Bumblebee // 2021.1.1 버전은 새 프로젝트를 생성 후 따로 의존성 추가를 하지 않아도 NotificationCompat이 사용 가능했습니다.
NotificationCompat 말고 Notification을 사용할 수도 있는데 Notification은 젤리빈(4.1) 이상 버전에서만 사용이 가능하고 NotificationCompat은 그 이하 버전도 사용이 가능합니다.
전체 소스 코드
package com.example.notification

import android.app.Notification
import android.app.NotificationChannel
import android.app.NotificationManager
import android.content.Context
import android.os.Build
import androidx.appcompat.app.AppCompatActivity
import android.os.Bundle
import android.widget.Toast
import androidx.core.app.NotificationCompat
import com.example.notification.databinding.ActivityMainBinding

class MainActivity : AppCompatActivity() {

    val CHANNEL_ID = "10000"
    val CHANNEL_NAME = "Soopeach Channel"

    val binding by lazy { ActivityMainBinding.inflate(layoutInflater) }

    override fun onCreate(savedInstanceState: Bundle?) {
        super.onCreate(savedInstanceState)
        setContentView(binding.root)

        createNotificationChannel()

        binding.btn.setOnClickListener {
            val title = binding.title.text.toString()
            val content = binding.content.text.toString()

            if (title.isNotEmpty() && content.isNotEmpty()) {

                val notificationManager =
                    getSystemService(NOTIFICATION_SERVICE) as NotificationManager
                notificationManager.notify(2, buildNotification(title, content))
            } else {
                Toast.makeText(this, "제목과 내용을 입력해주세요.", Toast.LENGTH_SHORT).show()
            }


        }


    }

    // 알림 채널 생성
    fun createNotificationChannel() {
        if (Build.VERSION.SDK_INT >= Build.VERSION_CODES.O) {
            val channel = NotificationChannel(
                CHANNEL_ID,
                CHANNEL_NAME,
                NotificationManager.IMPORTANCE_DEFAULT
            )
            val manager = getSystemService(NotificationManager::class.java)
            manager.createNotificationChannel(channel)
        }
    }

    fun buildNotification(title: String, content: String): Notification {
        if (Build.VERSION.SDK_INT >= Build.VERSION_CODES.O) {
            val builder = NotificationCompat.Builder(this, CHANNEL_ID)
                .setContentTitle(title)
                .setContentText(content)
                .setSmallIcon(R.drawable.ic_launcher_foreground)
                .setPriority(NotificationCompat.PRIORITY_DEFAULT)
                .build()
            return builder
        } else {
            val builder = NotificationCompat.Builder(this)
                .setContentTitle(title)
                .setContentText(content)
                .setSmallIcon(R.drawable.ic_launcher_foreground)
                .setPriority(NotificationCompat.PRIORITY_DEFAULT)
                .build()
            return builder
        }


    }

    fun deleteChannel() {
        val manager = getSystemService(NotificationManager::class.java)
        manager.deleteNotificationChannel("CHANNEL_ID")
    }

    fun modifyChannel(channelID: String){
        val manager = getSystemService(NotificationManager::class.java)
        val channel = manager.getNotificationChannel(channelID)
        channel.name = "수정된 채널 이름"
        manager.createNotificationChannel(channel)
    }

}
채널 생성
안드로이드 8.0 / 오레오(API 26)이상에서 알림을 제공하려면 NotificationChannel 객체를 createNotificationChannel()에 전달하는 방법으로 앱의 알림 채널을 등록해야합니다. 채널은 알림마다 설정되고 채널을 통해 개별 알림을 분류하고 설정을 할 수 있습니다.
fun createNotificationChannel(){
    if (Build.VERSION.SDK_INT >= Build.VERSION_CODES.O) {
        val channel = NotificationChannel(
            CHANNEL_ID,
            CHANNEL_NAME,
            NotificationManager.IMPORTANCE_DEFAULT
        )
        val manager = getSystemService(NotificationManager::class.java)
        manager.createNotificationChannel(channel)
    }
}
안드로이드 버전이 오레오이상이라면 채널을 만들도록 코드를 구성하였습니다. NotificationChannel()의 인자로는 채널의 아이디, 이름, 중요도가 들어갑니다.
channel을 생성해준 후 NotificationManager의 createNotificaionChannel() 함수를 이용하여 방금 만든 채널을 등록하여 줍니다.
채널은 설정-알림-앱 설정-해당 앱에서 확인할 수 있습니다.
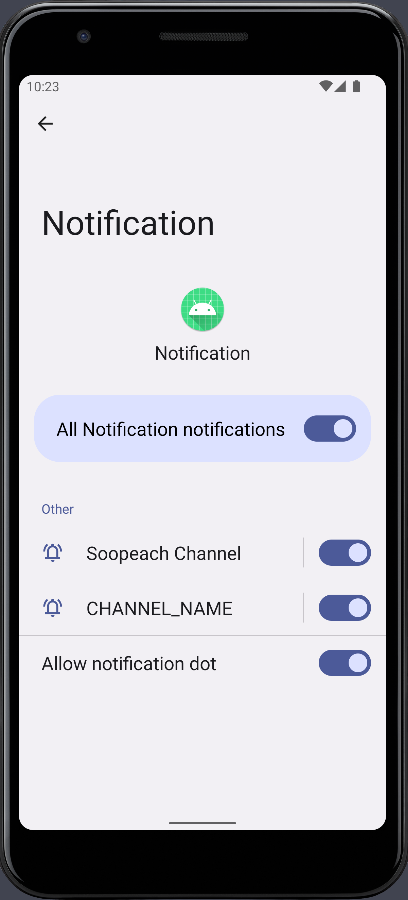
이런식으로 채널을 확인할 수 있습니다. 채널이 두개가 등록되어있는 것을 볼 수 있습니다. 아래의 CHANNEL_NAME이라는 이름을 가진 채널은 글을 쓰기전 테스트 하는 과정에서 NotificationChannel 객체를 생성할 때 CHANNEL_NAME ="soopeach Channel"의 CHANNEL_NAME을 넣은 것이 아니라 문자열로 "CHANNEL_NAME"을 넣어 잘못생성이된 채널입니다.
채널 삭제
fun deleteChannel() {
    val manager = getSystemService(NotificationManager::class.java)
    manager.deleteNotificationChannel("CHANNEL_ID")
}
위의 deleteChannel 함수는 CHANNEL_ID라는 채널명을 가지는 채널을 삭제하는 함수입니다. onCreate안에서 deleteChannel 함수를 실행시키고 다시 채널목록을 확인해보겠습니다.

CHANNEL_ID의 이름을 가진 채널명이 삭제된 것을 볼 수 있습니다.몇 번 실행해보면 알 수있지만 동일한 채널 아이디(CHANNEL_ID)를 가지는 채널은 중복생성이 되지 않습니다. 채널 아이디가 다르다면 같은 이름은 중복생성이 가능합니다.

채널 수정
fun modifyChannel(channelID: String){
    val manager = getSystemService(NotificationManager::class.java)
    val channel = manager.getNotificationChannel(channelID)
    channel.name = "수정된 채널 이름"
    manager.createNotificationChannel(channel)
}
위의 modifyChannel() 함수는 채널의 ID를 받아와서 그 채널을 찾고 그 채널의 이름을 변경해주는 함수입니다.
채널 변경은 위와 같이 아이디로 채널을 식별하여 할 수 있습니다. 하지만 이름과 설명(name, discription)만 수정이 가능하기 때문에 채널의 중요도, 진동 등을 변경하기 위해선 위에서 설명한 방식으로 채널을 삭제하고 다시만들어야합니다.
ex) 채널 아이디가 10000이고 채널 명이 "하이"라는 채널이 있다면 modifyChannel(10000)을 호출하여 "하이"라는 채널명은 "수정된 채널 이름"으로 변경됨.

이렇게 수정이 가능하다. 아래에 Soopeach Channel이 있는 이유는 다른 채널 ID의 채널로 생성해 주었기 때문입니다.
ex) "수정된 채널 이름" 채널의 채널 아이디는 10001, "Soopeach Channel" 채널의 채널 아이디는 10000
알림 생성
binding.btn.setOnClickListener {
    val title = binding.title.text.toString()
    val content = binding.content.text.toString()
    if (title.isNotEmpty() && content.isNotEmpty()) {

        val notificationManager =
            getSystemService(NOTIFICATION_SERVICE) as NotificationManager
        notificationManager.notify(1, buildNotification(title, content))
    } else {
        Toast.makeText(this, "제목과 내용을 입력해주세요.", Toast.LENGTH_SHORT).show()
    }

}
버튼이 클릭되었다면 알림의 제목, 내용이 비어있는지 확인합니다. 둘 중 하나라도 비어있다면 Toast로 경고창이 발생하고 그렇지 않다면 NotificationManager의 notify()함수를 이용하여 알림을 생성합니다. 첫 번째 인자로는 0을 제외한 정수가 들어갈 수 있습니다. 해당 알림을 식별하기 위함입니다. 두 번째 인자로는 Notification객체가 들어갑니다. 저는 buildNotification 함수를 이용하여 Notification 객체를 반환 받도록 함수를 구성하였습니다.
fun buildNotification(title: String, content: String): Notification {
    if (Build.VERSION.SDK_INT >= Build.VERSION_CODES.O) {
        val builder = NotificationCompat.Builder(this, CHANNEL_ID)
            .setContentTitle(title)
            .setContentText(content)
            .setSmallIcon(R.drawable.ic_launcher_foreground)
            .setPriority(NotificationCompat.PRIORITY_DEFAULT)
            .build()
        return builder
    } else {
        val builder = NotificationCompat.Builder(this)
            .setContentTitle(title)
            .setContentText(content)
            .setSmallIcon(R.drawable.ic_launcher_foreground)
            .setPriority(NotificationCompat.PRIORITY_DEFAULT)
            .build()
        return builder
    }


}
buildNotification 함수는 위와 같습니다. 맨 위에서 설명한 대로 오레오 버전 이상부터는 채널 아이디가 반드시 필요하기 때문에 this(context)와 CHANNEL_ID를 인자로 주었습니다. 여기서 CHANNEL_ID 는 위에서 채널 생성, 등록한 채널의 아이디와 동일해야합니다. 다르다면 알림이 생기지 않습니다.
오레오 버전이 아니라면 CHANNEL_ID는 제외하고 this만 인자로 주고 Notification을 생성해줍니다.
setContentTitle 은 알림의 제목,
setContentText 는 알림의 내용,
setSmallIcon은 알림의 작은 아이콘을(setSmallIcon 부분을 제외하고 알림을 전송하면 앱이 튕김),
setPriority는 알림의 중요도를 설정합니다.(default로 설정).
build를 통해 Notification으로 만들어줍니다.
위와 같이 Notification을 만들고 반환해주면 이제 알림을 생성할 수 있게 됩니다.
NotificationCompat을 이용하여 Notification을 build할 때 조금 더 다양한 옵션들(더 긴 내용의 알림 등)을 설정할 수 있습니다.
예제 코드
https://github.com/soopeach/simpleNotification
GitHub - soopeach/simpleNotification
Contribute to soopeach/simpleNotification development by creating an account on GitHub.
github.com
'안드로이드[Android]' 카테고리의 다른 글
| 안드로이드 스튜디오[Android Studio] 파이어스토어 데이터베이스(Firestore Database) 연동(firebase) (0) | 2022.04.28 |
|---|---|
| 안드로이드[Android] HTTP프로토콜 형식으로 FCM에서 백그라운드 메시지 보내기(POSTMAN) (0) | 2022.04.17 |
| 안드로이드[Android] ConcatAdapter / MergeAdapter 사용하기 (0) | 2022.04.08 |
| 안드로이드[Android] EditText 입력 글자수 제한, 표기 / 문장수 제한 (0) | 2022.04.05 |
| 안드로이드[Android] 안드로이드 백그라운드에서 알림보내기(FCM) (2) | 2022.04.01 |


최근댓글